

 1/13/2015 12:20:00 AM
 Unknown
POST NO: 56
Before Start to adding or setup your custom domain to
Blogger.com, it’s important that you realize, it isn’t so difficult to adding
domain in your blogger account. If you are a blogger, it’s the perfect position
to setup your domain to blogger account to be a professional blogger. It shows
your passion and love and provides you with freedom to move from one single
platform to another. AND also from USER’S perspective, it is much easier for
them to visit your blog at customized address like-www.myexampleblog.com than http://myexampleblog.blogspot.com/
Before setup you have to know that there have some popular
web hosting sites, if you don’t already have purchased yourself a custom
domain, these are the places that you should be looking for to get one:
EasayDNS, GoDadyy.com, Yahoo! Small Business, No-IP, 1 and
1, ix web hosting etc.etc. So, now it is the perfect time to setup process your
custom domain in your blogger account. Her I’m using EasyDNS for setup your
domain provider, others hosting sites setup process is almost same. So, be
easy.
Setting Up your Blogger Account
- Login to your blogger account with Google
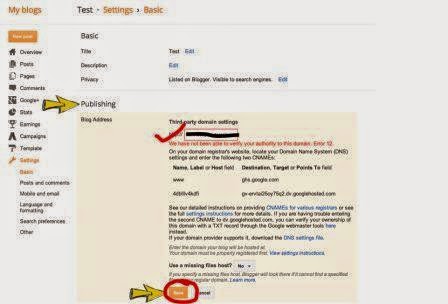
- Click on the dropdown menu and choose Settings > Basic.
- Under the Publishing sector, click on the +Set up
third-party URL for your blog.

- Enter the domain with www in front of it. i.e. www.exampleblog.com and click on Save. Once you clicked on the save button, here you will see an error32 message.

Within the error message you should see two sets of CNAME records. This is the information that Google uses to verify that you are indeed the owner of the domain name. You will need to take these two records and put of them into your DNS settings. Note: Do not close your blog while you are doing this.
Setting Up your EasyDNS Account
- Firstly log into your easyDNS account.
- Click on the DNS link for said domain, this will bring you to the DNS settings page.

- Nextly Click on the Modular Editor tab.
- Click on the Wrench Tool for Aliases CNAME records.

Here, the Modular Editor tab enters the CNAME records that was Google provided us on their error 32 page in blogger settings account. Please note: that both the www and the short string of numbers and/or letters will go under Host while the ghs.google.com along with the longer string will go under Address.
- Enter your CNAME records.
- Click on Next.
- In here you will see a grayed out error claiming ***** is not a valid server. This is normal and you can just ignore it.
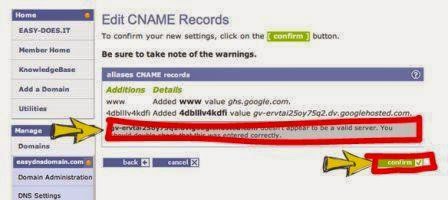
- Next Confirm your changes.
Finalizing the Game with Blogger Account
Once you’ve put in the CNAME records within your DNS
settings, you will need to go back to the blog window with the error message that
should still be opened. Now do the following things:
- Click on Save.
You will notice the error message has gone away. If this is the case then your domain name should be successfully connected to your blog, but you still have a few more steps to complete it. If you are still seeing the error message then google has failed to verify that you are the domain owner. At this point you have a few options. Google has a multiple ways to verify that you are the genuine domain OWNER. At this point you have a few options- Google has multiple ways to verify domain ownership. You can also choose to trouble shoot yourself through Google’s help documents.
- Now go back to the publishing section of your blogger account and click on Edit.

- Check off the box and click Save.

Note: The original connection of your newly domain just connected the root variation of said domain. To connect both the root and www variation, you will need to check off the box. Your blog is now connected to your domain.
Thank you for giving your time and patience. Keep blogging and stay with UPDATETECHNOLOGY.
READ ALSO
 Posted in: Domain Setup


